Why a DIY Produce Wash is Essential for Your Health and Wallet
In our modern world, enjoying fresh fruits and vegetables is a cornerstone of a healthy diet. However, a quick rinse under the tap might not be enough to rid your produce of unwanted guests. Most conventionally grown produce is treated with pesticides, and many items also feature a coating of wax to improve appearance and shelf life. While choosing organic options is ideal, it’s not always accessible or affordable for everyone. Even organic produce can benefit from a thorough cleaning, as it's still handled by many hands, exposed to environmental contaminants, and can carry bacteria from soil or processing.
This is where a diy fruit and vegetable wash homemade produce wash recipe becomes an invaluable tool in your kitchen arsenal. Forget those expensive, store-bought produce sprays that often cost a fortune. You can create a highly effective solution at home for pennies, giving you peace of mind that your family is consuming cleaner, healthier produce. The beauty of a Homemade Produce Wash: Cheaper & Better Than Store Sprays is its simplicity and the powerful cleaning action it provides, far surpassing what plain water can achieve.
The Simple & Effective Homemade Produce Wash Recipe
The secret ingredient in most effective homemade produce washes? Plain white vinegar. Its natural acidity makes it a powerful agent for breaking down the waxy layers on fruits and vegetables, dissolving pesticide residues, and killing bacteria and mold spores. Beyond cleanliness, this simple method also helps your produce make fruit last longer, reducing food waste and saving you money.
You'll know this method works when you see the evidence with your own eyes. After soaking, the water often appears visibly dirty, and fruits like apples and grapes will lose their artificial sheen, revealing the subtle white residue where wax once clung.
General Method for Most Fruits and Vegetables:
- Prepare Your Basin: Start with a clean kitchen sink or a large mixing bowl placed in the sink. Ensure it’s sparkling clean to avoid transferring new contaminants to your produce.
- Add Produce and Water: Place your fruits and vegetables into the clean basin. Avoid overcrowding; if you have a large batch, work in smaller groups. Cover the produce generously with cold water.
- Introduce Vinegar and Soak: Pour 1-2 cups of plain white vinegar into the water. The exact amount can vary depending on the volume of water and produce. Allow the produce to soak for 10-15 minutes. For items that float, like apples, gently swirl them around every few minutes or rub them lightly with your fingertips to ensure all surfaces are exposed to the wash.
- Rinse Thoroughly: Drain the dirty water and rinse all the produce exceptionally well under cool, running water. This crucial step ensures no vinegary taste remains. With a good rinse, your produce will be fresh, clean, and entirely free of any vinegar flavor.
This general approach works wonderfully for firm-skinned fruits and vegetables such as apples, grapes, bell peppers, cucumbers, potatoes, and more. For a deeper dive into vinegar's efficacy, explore Vinegar Fruit Wash: The Secret to Cleaner, Healthier Produce.
Tailoring Your Wash for Different Produce Types
While the basic vinegar and water solution is highly versatile, certain types of produce require a slightly modified approach due to their delicate nature or unique structure.
Washing Leafy Greens (Lettuces, Spinach, Kale):
Leafy greens require a gentler touch and shorter soak time to prevent them from becoming soggy.
- Short Soak: Place greens in a clean sink or large bowl, cover with cold water, and add about 1 cup of vinegar. Swirl them gently and allow them to soak for only 1-2 minutes.
- Rinse Meticulously: Rinse the greens very thoroughly under running cold water, ensuring all traces of vinegar and loosened debris are gone.
- Dry Completely: This is the most critical step for greens. Excess moisture causes rapid spoilage. Use a salad spinner to remove as much water as possible, or gently pat them dry with clean paper towels or a kitchen towel.
- Proper Storage: Store completely dry greens in airtight containers lined with paper towels, or in Ziploc bags with all the air pressed out. The paper towels absorb any residual moisture, keeping greens crisp and fresh for much longer.
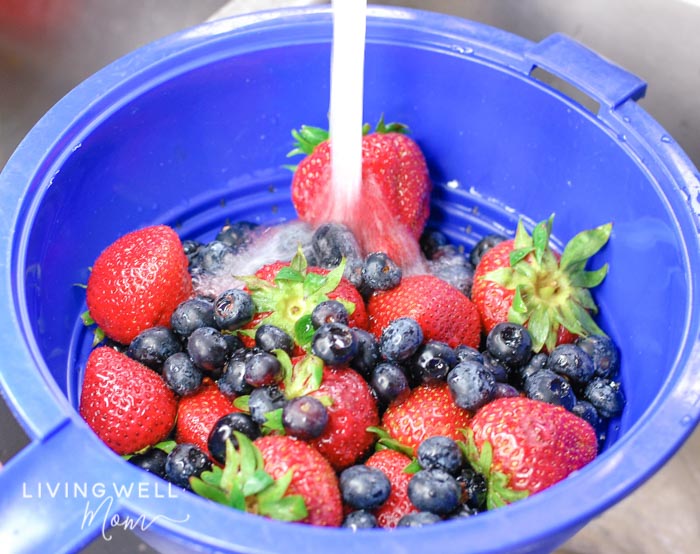
Caring for Delicate Berries (Strawberries, Blueberries, Raspberries, Blackberries):
Berries are prone to mold and bruising, making proper washing and drying essential for extending their life.
- Gentle Bowl Soak: Place berries in a large mixing bowl. Cover them with cold water and add about 1 cup of vinegar. Gently swirl them with your hands for about 5 minutes, as they tend to float. The vinegar solution helps destroy bacteria and mold spores, significantly boosting their shelf life.
- Thorough Rinse: Drain the water and rinse the berries very well under cool, gentle running water to remove any vinegar residue.
- Delicate Drying: Spread rinsed berries out on a clean towel or several layers of paper towels. For sturdier berries like blueberries or strawberries, gently pat them dry. For more delicate raspberries and blackberries, it's often best to let them air dry completely to avoid crushing. You can also use a salad spinner lined with a few paper towels for a quick dry, but be extremely gentle.
- Smart Storage: Once thoroughly dry (or mostly air-dried for raspberries/blackberries), transfer them to an airtight container lined with paper towels. This method can help your berries last anywhere from one to two weeks on average in the refrigerator, preventing premature mold growth.
Quick Spray Solution for Hardier Produce:
For items that are difficult to submerge, or when you need a quick clean for a single piece of produce, a spray solution is a great alternative.
- Mix Your Spray: Combine 3 parts water with 1 part plain white vinegar in a clean spray bottle.
- Spray and Wait: Spray the produce thoroughly with the solution, ensuring all surfaces are covered. Let it sit for a few minutes to allow the vinegar to work its magic.
- Rinse and Enjoy: Rinse the produce well under running water before storing or consuming.
Beyond the Wash: Maximizing Freshness and Safety
Washing your produce with a homemade produce wash recipe is a fantastic first step, but how you handle and store it afterward is just as crucial for longevity and safety.
- The Power of Drying: As emphasized for greens and berries, thorough drying is paramount. Excess moisture is a breeding ground for bacteria and mold, accelerating spoilage. Invest in a good salad spinner and always have clean paper towels on hand.
- Strategic Storage: Once clean and dry, store produce in appropriate containers. Airtight containers help maintain humidity and prevent odors, while paper towel linings absorb moisture. Keep ethylene-producing fruits (like apples and bananas) separate from ethylene-sensitive vegetables (like lettuce and broccoli) to prevent premature ripening and spoilage.
- Pre-Washing Benefits: Making a habit of washing all your produce immediately after grocery shopping offers several advantages. It frees up time during meal prep, makes healthy snacking incredibly easy, and ensures your produce is ready to use whenever inspiration strikes. Imagine pulling out pre-washed grapes or carrot sticks for a snack tray!
- Health and Convenience: By taking these few extra steps, you not only remove harmful substances but also prolong the life of your produce, reducing food waste and saving money. You’re also making a conscious choice for better health, ensuring every bite is as clean and nutritious as possible.
Conclusion
Adopting a diy fruit and vegetable wash homemade produce wash recipe is a simple yet profoundly impactful change you can make for your kitchen and your health. It’s an inexpensive, effective method to remove pesticides, waxes, and bacteria that plain water leaves behind, all while helping your delicious fruits and vegetables make fruit last longer. This small investment of time yields significant returns in cleanliness, freshness, and peace of mind. Give this method a try, and experience the satisfaction of cleaner, healthier produce and a more efficient kitchen.
